4th of July Charcuterie Board
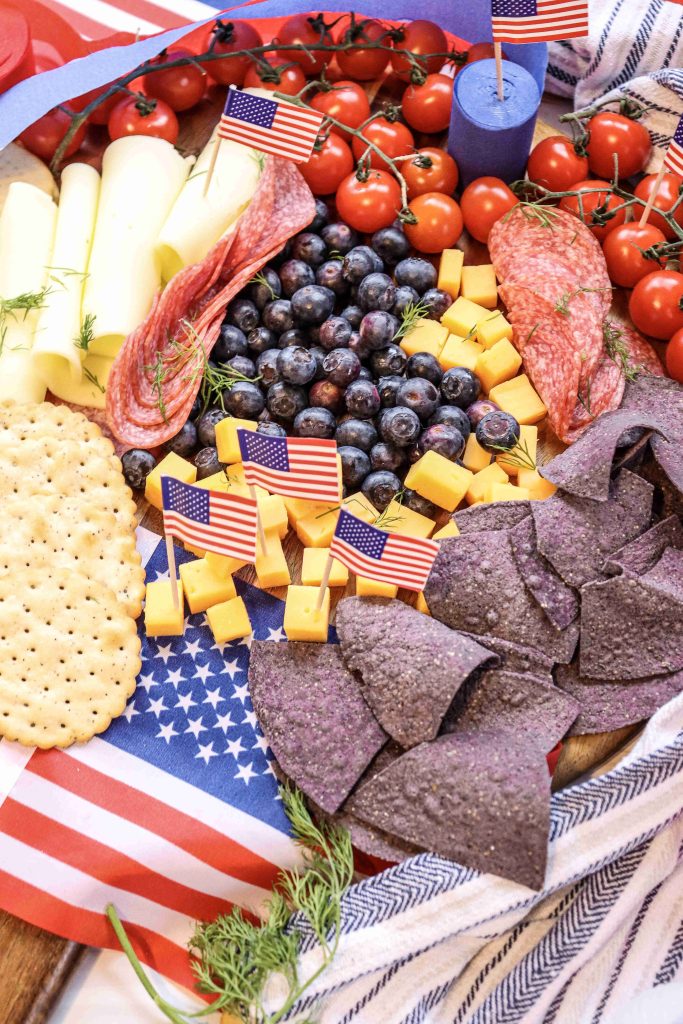
This 4th of July charcuterie board is the easy, festive snack you can set out while everyone is arriving, grabbing drinks, or waiting for the grill. It is colorful, savory, crisp, creamy, and full of simple store-bought favorites.
The best part is that it looks styled without needing much work. Keep the blue section tight, repeat the red and white ingredients, and you get that patriotic look fast. Scroll down for the ingredients and step-by-step.
Why you’ll love this 4th of July charcuterie board
This board is made for low-stress hosting. It works as an appetizer, snack board, pool party platter, or easy patriotic centerpiece for the food table.
You’ll love it because:
- It is quick to assemble, about 25 to 30 minutes total.
- It is mostly no-cook, besides cutting the cheese stars.
- It works for adults and kids.
- It gives you a savory red, white, and blue food idea, not another dessert.
- It is easy to customize without changing the main look.
- It is great for Memorial Day, 4th of July, Labor Day, BBQs, and summer parties.
Recipe details
- Servings: 6
- Cuisine: American, festive, easy to assemble
- Prep time: 15 minutes
- Total time: About 25 to 30 minutes
- Chill or hold time: 0 to 15 minutes if letting it rest before guests arrive
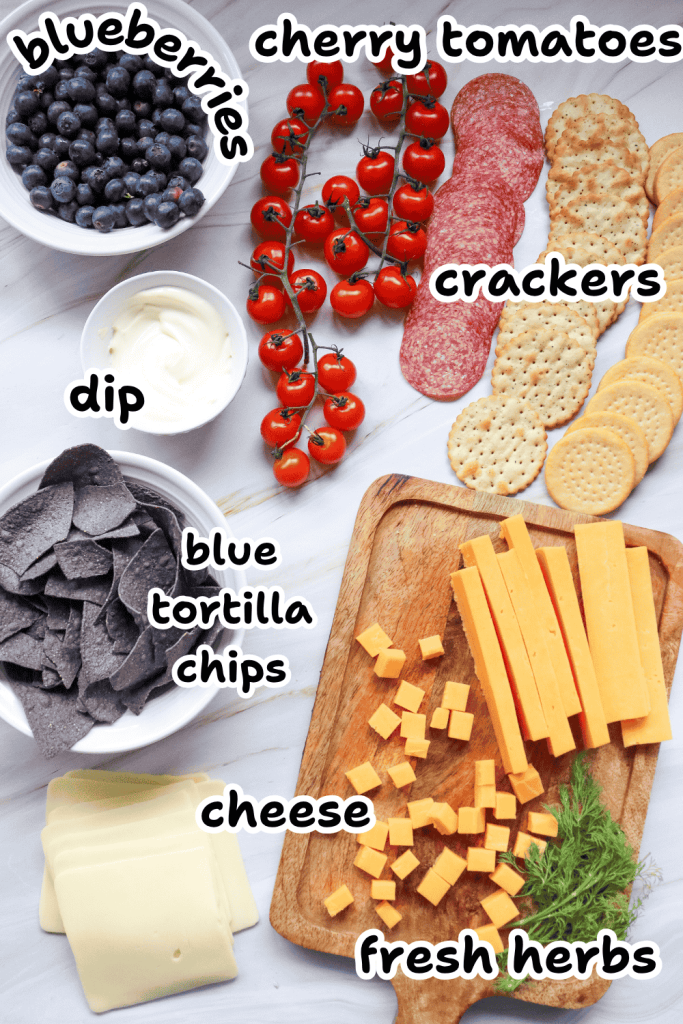
Ingredients
- Cherry tomatoes: 2 cups (about 300 g)
- Cheese cubes: 1 to 1.5 pounds total (450 to 680 g), cheddar or your favorite cheese
- Your favorite dip: 1 small bowl, about 1 cup (240 ml), such as hummus, ranch, or a red, white, and blue yogurt dip
- Assorted crackers: as needed, about 6 to 8 ounces (170 to 225 g), such as water crackers or seeded crackers
- Blue tortilla chips or blue corn chips: 1 bag, about 9 ounces (255 g)
- Salami or other cured meat: 10 to 12 slices, rolled or folded
- Blueberries: 1 to 1.5 cups (150 to 225 g)
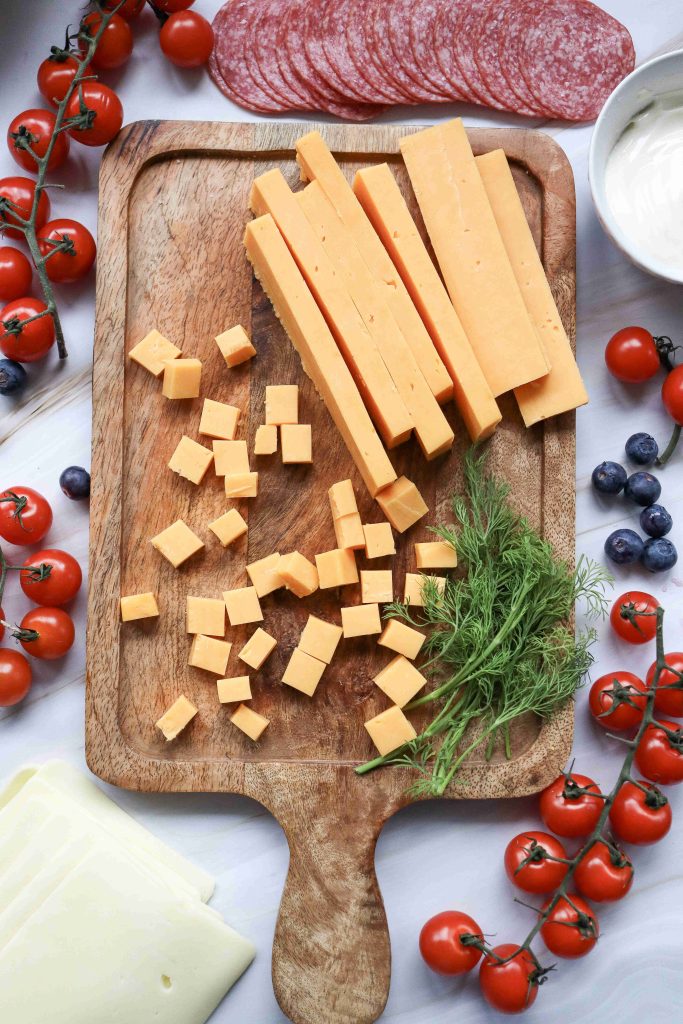
- Swiss cheese slices: 8 to 10 slices, cut into star shapes
- Fresh herbs: optional, parsley or dill for garnish
- Optional patriotic touches: small edible sugar sprinkles, mini flag picks, or red and white striped napkins
Practical tips before you start
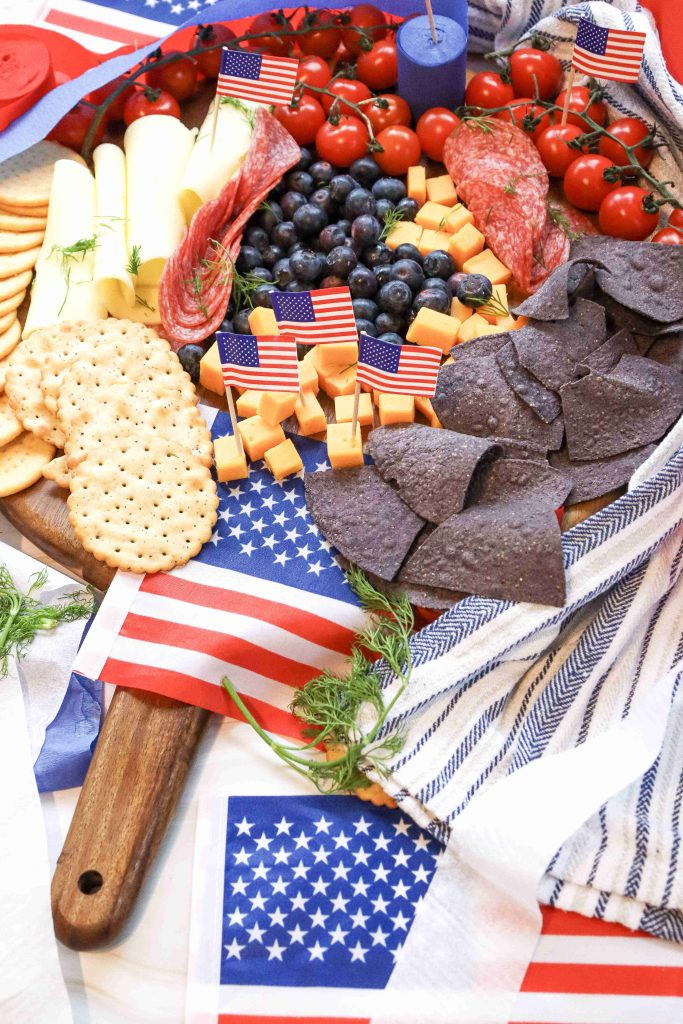
- Use a board that is a little bigger than you think you need. If everything is packed too tightly, the red, white, and blue pattern gets lost.
- Dry the tomatoes and blueberries very well before adding them. That small step helps keep the crackers and chips crisp.
- Cut the Swiss cheese stars while the cheese is cold. Soft, room-temperature cheese can bend or tear when you press the cutter into it.
- Keep the crackers and blue corn chips off the board until the end if you are prepping ahead. They are the first things to go soft if they sit next to dip, tomatoes, or berries.
- For the cleanest patriotic look, keep the blueberries in one tight corner or cluster. Scattered blueberries still taste good, but they do not read as clearly as the “blue field” of the board.
How to make a 4th of July charcuterie board
1. Choose your board or platter
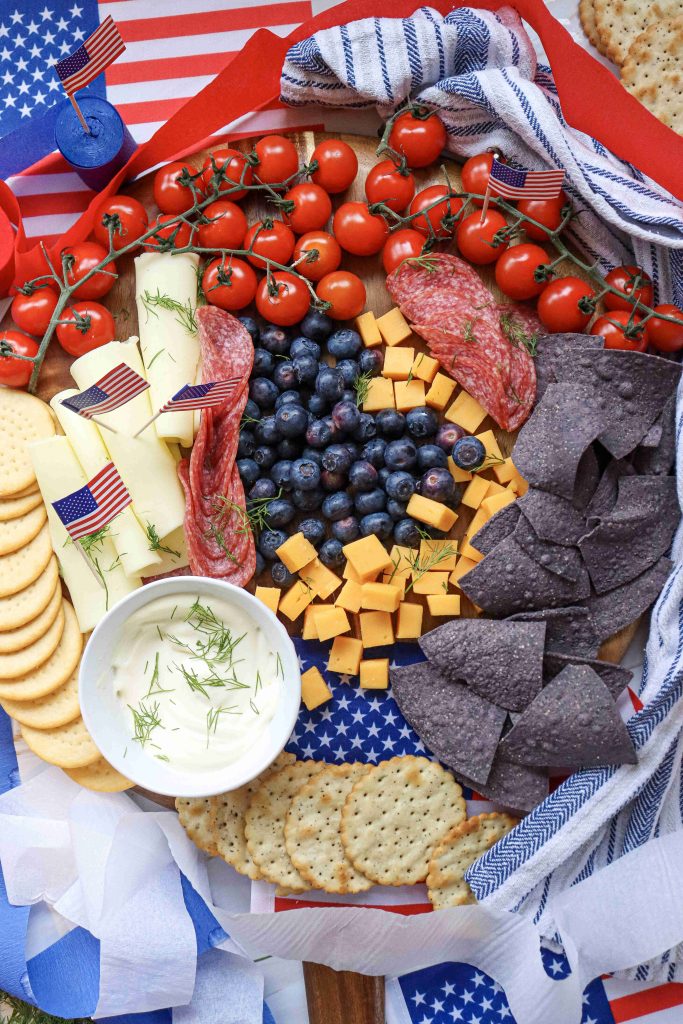
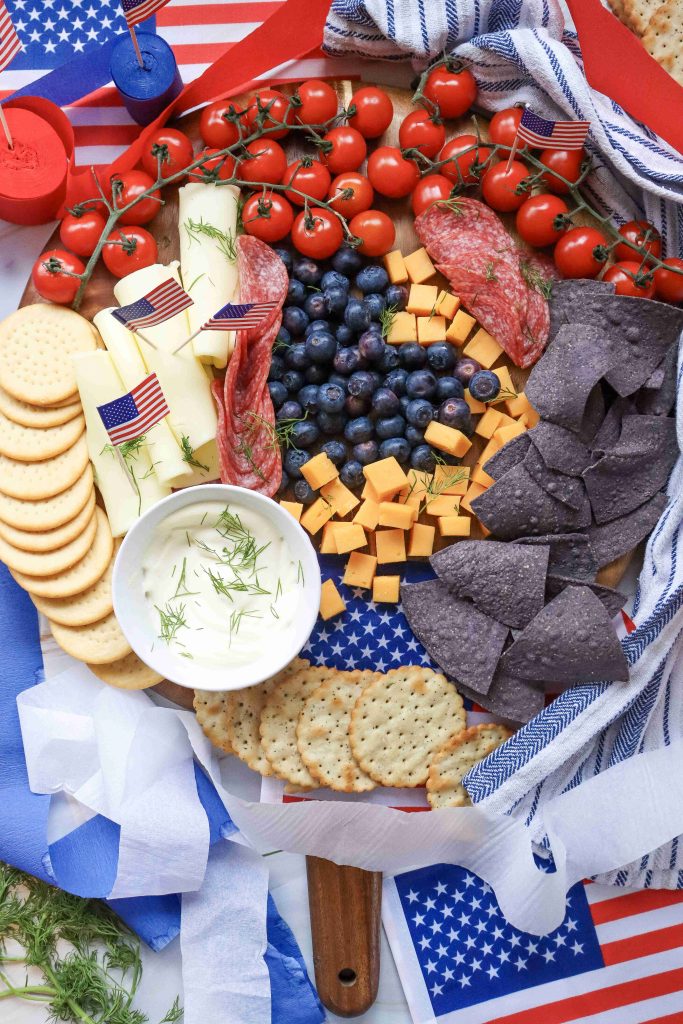
Use a large wooden board, tray, or platter. You want enough space to create a color-blocked layout without piling everything on top of itself.
A large board works best, but you can also use a sheet pan lined with parchment paper if that is what you have.
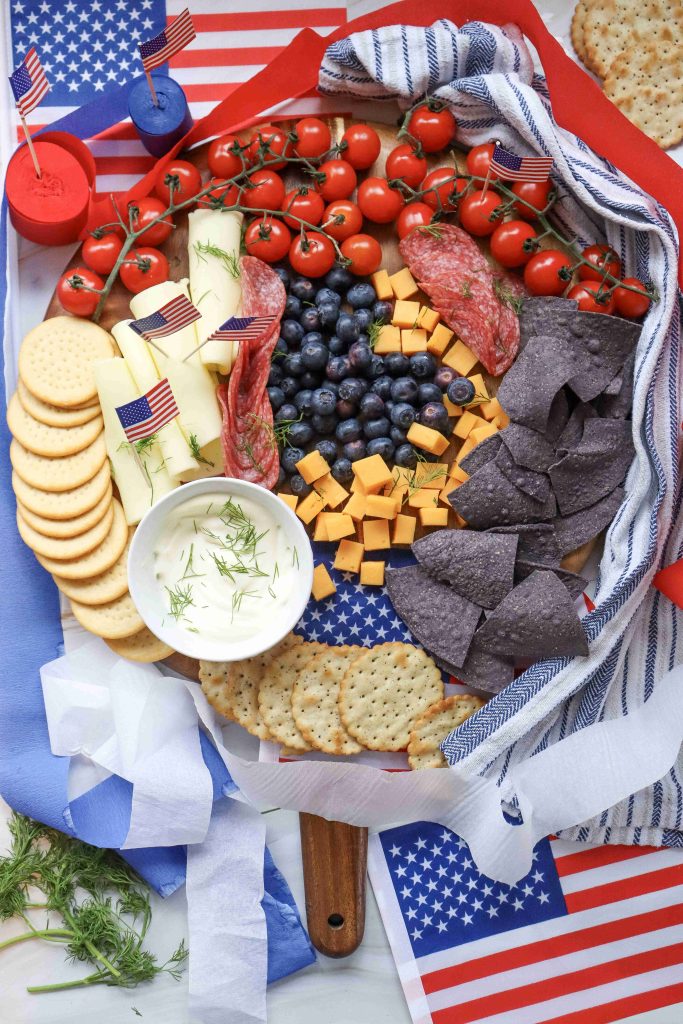
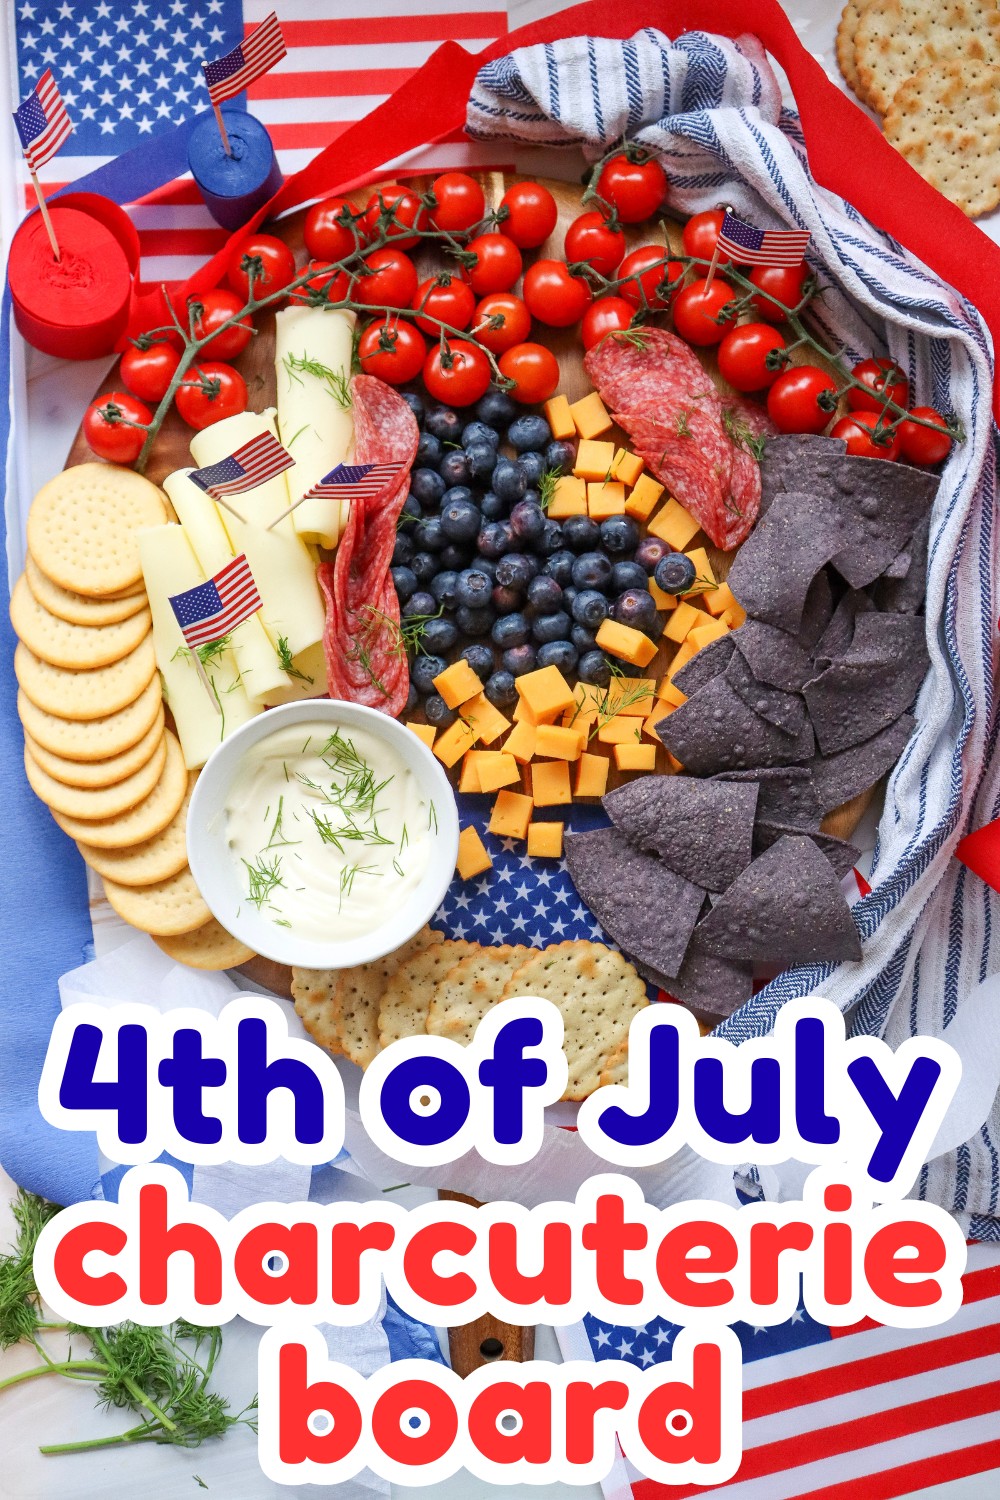
2. Add the dip bowl
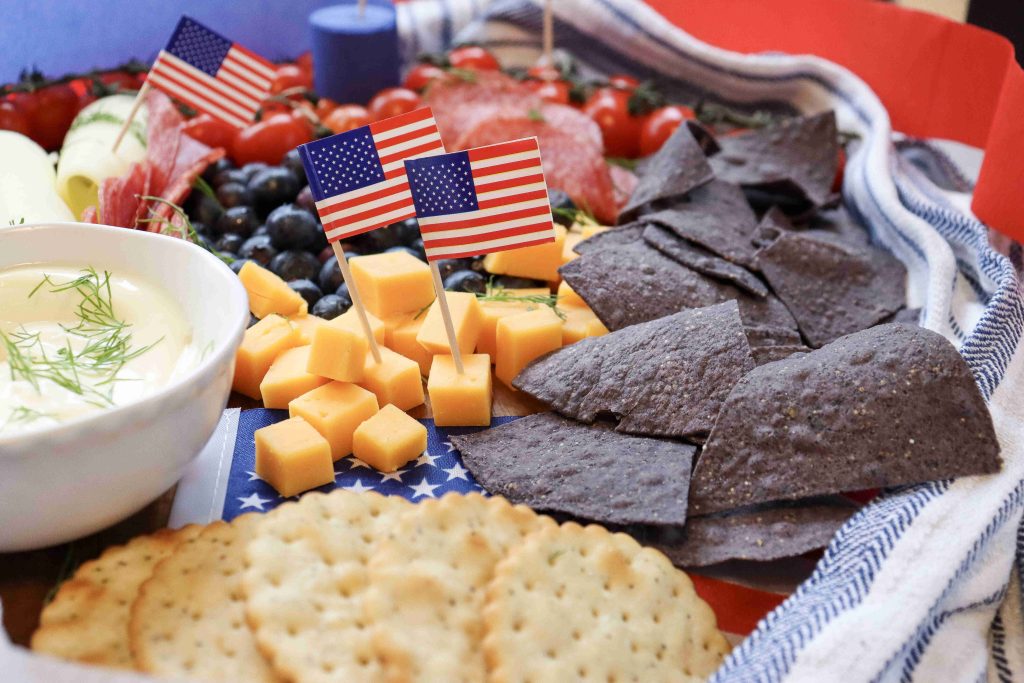
Place your dip bowl in the center or slightly off to one side. This anchors the board and gives you a natural place to build around.
Ranch, hummus, whipped feta, garlic-herb dip, or salsa all work well. A white dip gives the board a clean red, white, and blue look.
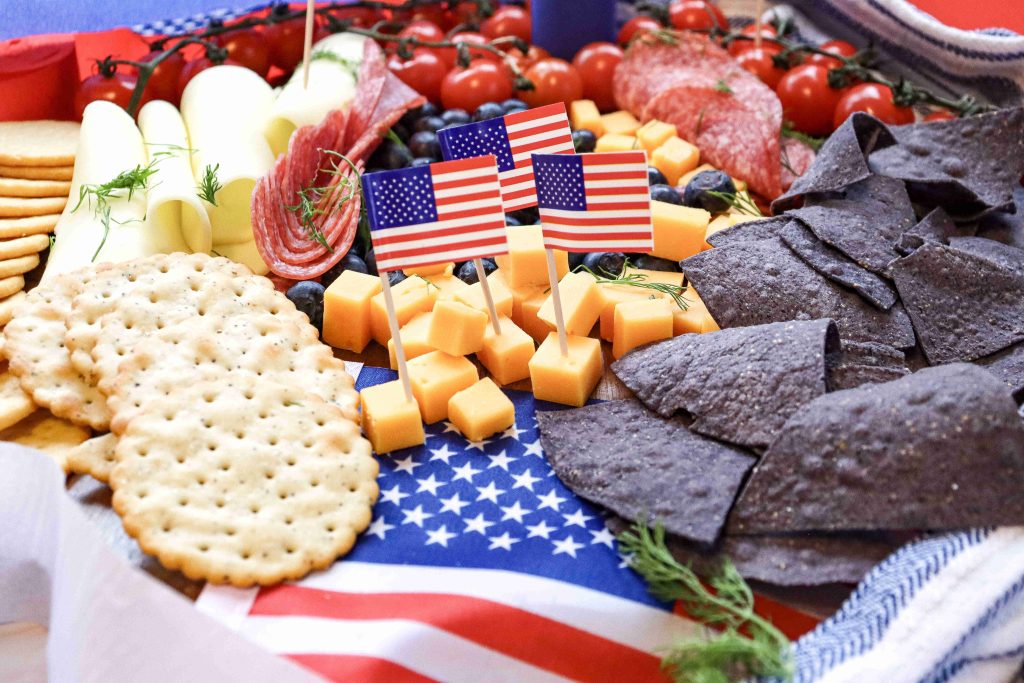
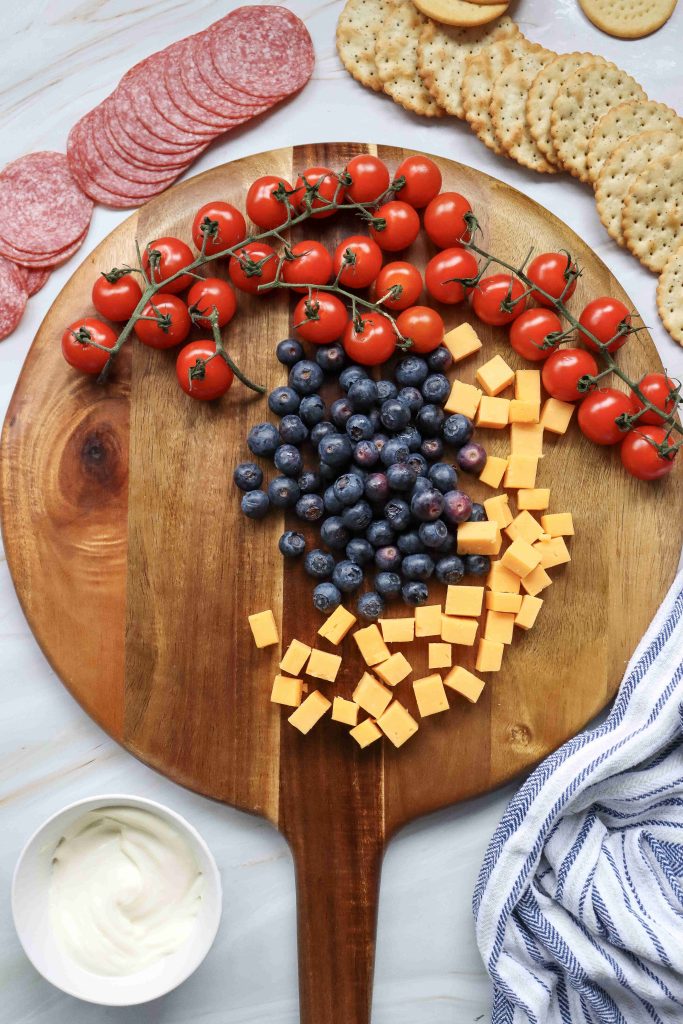
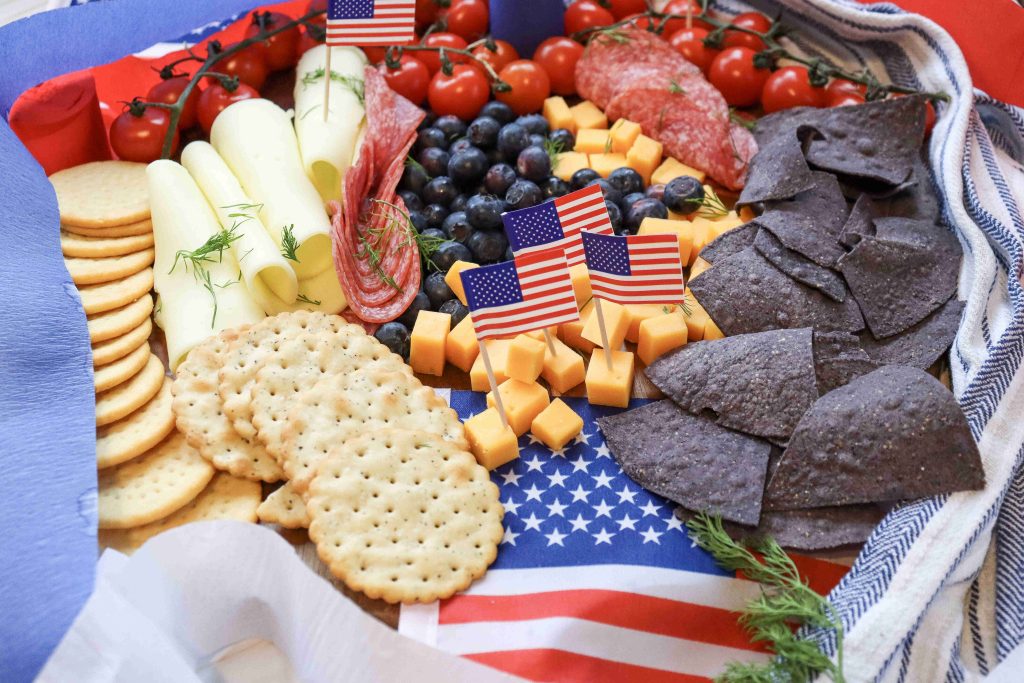
3. Build the blue section
Add the blueberries in a small corner to create the blue field. Keep them grouped together so the color looks intentional.
Add blue tortilla chips nearby or tuck them upright around the dip bowl for height and crunch.
4. Add the red ingredients
Arrange the salami in a line, stripe, or fanned section. You can roll the slices, fold them in quarters, or layer them in a loose row.
Add the cherry tomatoes in small clusters. Try not to place them directly against the crackers if they are juicy.
5. Add the white and cheese elements
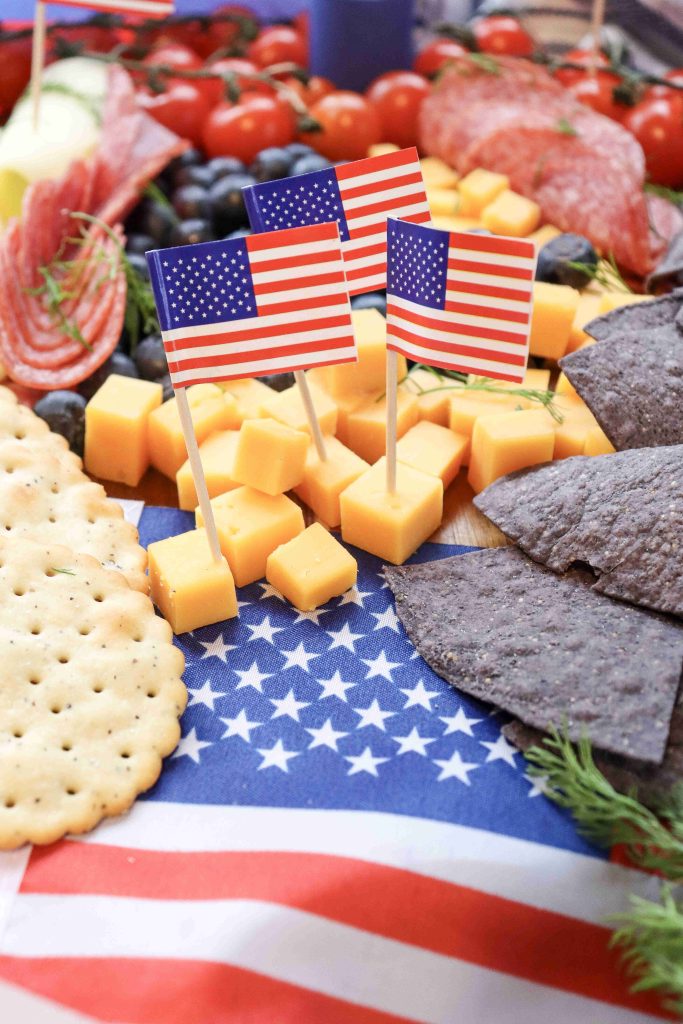
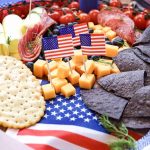
Place the Swiss cheese stars on top or in a clear white section so they stand out. Add the cheese cubes in small piles around the board.
If you have both orange cheddar and a white cheese, use them in separate areas for better contrast.
6. Fill in with crackers and chips
Add the crackers and extra blue corn chips last so they stay crisp. Tuck them into open spaces around the cheese, salami, and dip.
This is also where you can adjust the board. If one area looks too heavy, move a few crackers or cheese cubes to balance the colors.
7. Garnish and serve
Add a few sprigs of parsley or dill for a fresh pop of green. Keep it light so the patriotic colors stay the focus.
If using mini flag picks or napkins, add them right before serving.
Optional upgrades
- Add a small bowl of red salsa for extra color.
- Use whipped feta as the white dip.
- Add cucumber slices or bell pepper strips for a fresher board.
- Add olives, roasted chickpeas, or extra hummus for a Mediterranean-inspired version.
- Use gluten-free crackers if serving gluten-free guests.
- Make it vegetarian by leaving off the salami and adding more cheese, veggies, hummus, or nuts.
Make-ahead tips
You can prep the ingredients ahead, but I would not fully assemble the board too early.
Prep ahead:
- Cut the cheese stars.
- Cube the cheese.
- Wash and fully dry the tomatoes.
- Wash and fully dry the blueberries.
- Roll or fold the salami.
- Add the dip to a covered bowl.
- Gather the crackers, chips, picks, and serving utensils.
Wait to add:
- Crackers
- Blue corn chips
- Fresh herbs
- Decorative picks or sprinkles
For the best texture, assemble the chilled items first, then add the crackers and chips right before serving.
Serving tips
If serving indoors, set the board out shortly before guests arrive. For outdoor parties, keep it chilled as long as possible before serving, especially if the weather is hot.
Set out small tongs, toothpicks, or cheese picks so guests can grab what they want easily.
Keep extra crackers and chips nearby for refilling. It is better to refresh the board as people snack than to crowd everything onto the platter at once.
What to serve with it
This 4th of July charcuterie board works well before or alongside:
- Burgers
- Hot dogs
- BBQ chicken
- Grilled chicken
- Pasta salad
- Potato salad
- Corn on the cob
- Fruit salad
- Lemonade
- Summer cocktails or mocktails
Common mistakes to avoid
- Do not add the crackers too early if the board is sitting for a while. They can soften near the dip, tomatoes, or berries.
- Do not scatter the blue ingredients everywhere. A tight blue section makes the board look more like a patriotic flag-inspired platter.
- Do not overload the board with too many decorations. The cheese stars, blueberries, tomatoes, and blue chips already give it a festive look.
- Do not skip drying the fruit and tomatoes. Moisture is the fastest way to make a snack board messy.
This 4th of July charcuterie board is simple, festive, and easy to pull together with familiar ingredients. It gives you a savory patriotic appetizer that looks fun on the table without keeping you stuck in the kitchen.
4th of July Charcuterie Board
Ingredients
- 2 cups cherry tomatoes about 300 g
- 1 to 1.5 pounds cheese cubes cheddar or your favorite cheese (450 to 680 g)
- 1 cup dip such as hummus, ranch, or a red, white, and blue yogurt dip (240 ml)
- 6 to 8 ounces assorted crackers such as water crackers or seeded crackers (170 to 225 g)
- 1 bag blue tortilla chips or blue corn chips about 9 ounces (255 g)
- 10 to 12 slices salami or other cured meat rolled or folded
- 1 to 1.5 cups blueberries 150 to 225 g
- 8 to 10 Swiss cheese slices cut into star shapes
- Fresh parsley or dill optional, for garnish
- Small edible sugar sprinkles, mini flag picks, or red and white striped napkins optional, for a patriotic touch
Instructions
- Choose a large wooden board, tray, or platter. Leave enough space for the red, white, and blue sections to stand out.
- Place the dip bowl in the center of the board or slightly off to one side. This gives the board an anchor and makes it easier to arrange the other ingredients around it.
- Add the blueberries to one corner or one side of the board to create the blue section. Keep them in a tight cluster so the color looks intentional.
- Add the blue tortilla chips near the blueberries or tuck them around the dip bowl. Add them closer to serving time if you want them to stay extra crisp.
- Arrange the salami in a loose stripe, curved line, or fanned section. Roll or fold the slices so they are easy for guests to grab.
- Add the cherry tomatoes in small clusters around the board. Pat them dry first so they do not make nearby crackers soft.
- Add the cheese cubes in small piles across the board. Use them to fill empty spaces and balance the red, white, and blue colors.
- Cut the Swiss cheese slices into star shapes and place them on top or in a visible white section. Cold cheese is easier to cut cleanly, so keep it chilled until you are ready to shape it.
- Fill in the remaining spaces with crackers. Keep crackers away from wet ingredients like dip, tomatoes, and berries as much as possible.
- Add a few sprigs of parsley or dill, if using. Finish with optional flag picks or other patriotic touches, then serve.
Notes
- For the crispest board, add the crackers and blue corn chips last.
- If prepping ahead, wash and dry the berries and tomatoes, cut the cheese stars, cube the cheese, fold the salami, and portion the dip into a bowl. Assemble the board shortly before serving.
- If serving outdoors, keep the board chilled until guests arrive, especially in hot weather.
- For a vegetarian version, skip the salami and add extra cheese, hummus, vegetables, olives, nuts, or roasted chickpeas.
- For a gluten-free version, use gluten-free crackers and make sure the chips and dip are gluten-free.
Optional swaps
- Use whipped feta, ranch, garlic-herb dip, hummus, or salsa.
- Use white cheddar, Colby Jack, Monterey Jack, pepper jack, or cheddar cubes.
- Add cucumber slices, bell pepper strips, olives, or extra berries.
- Use small mozzarella balls for another white ingredient.
- Add a small bowl of red salsa for more color.