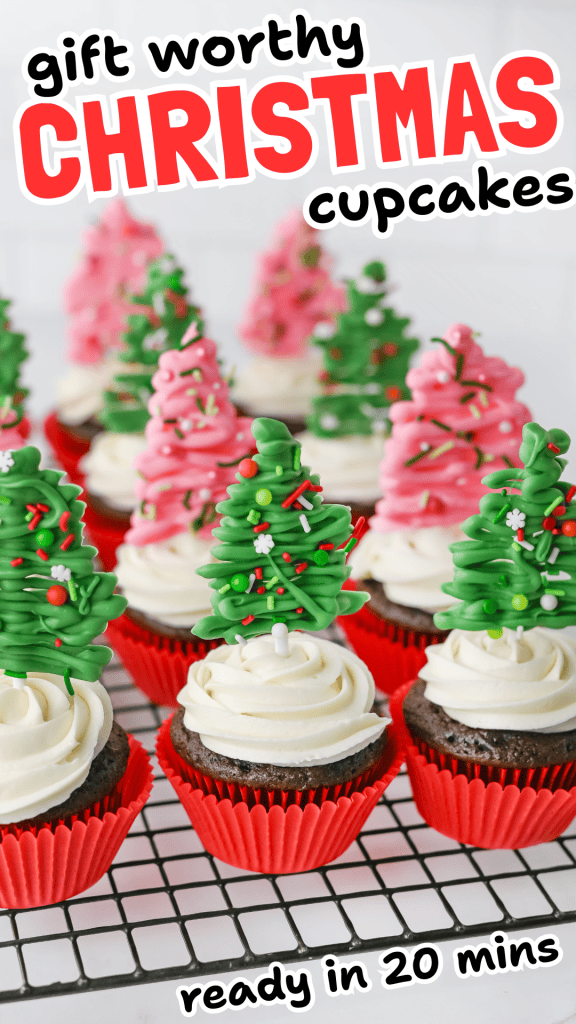
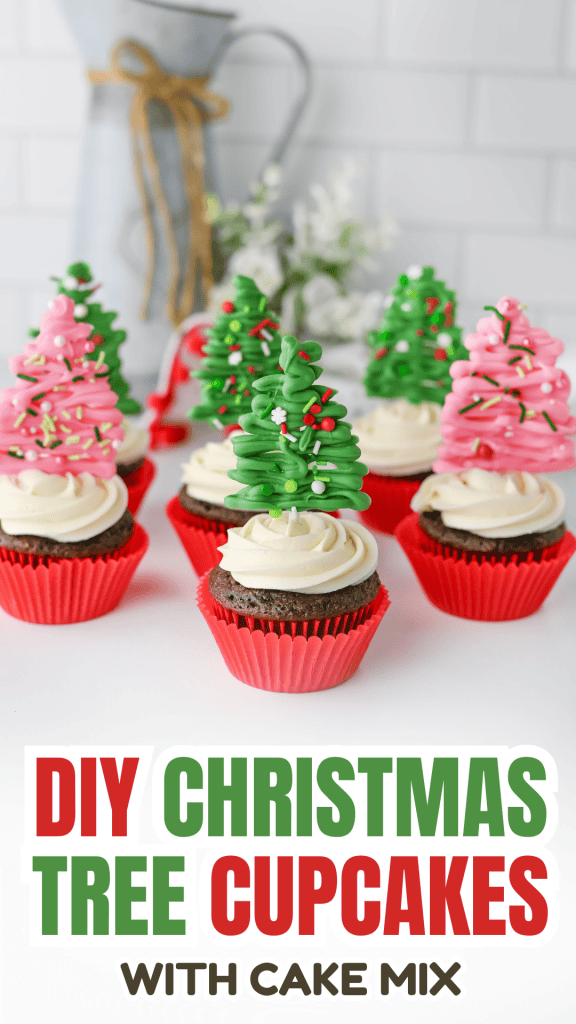
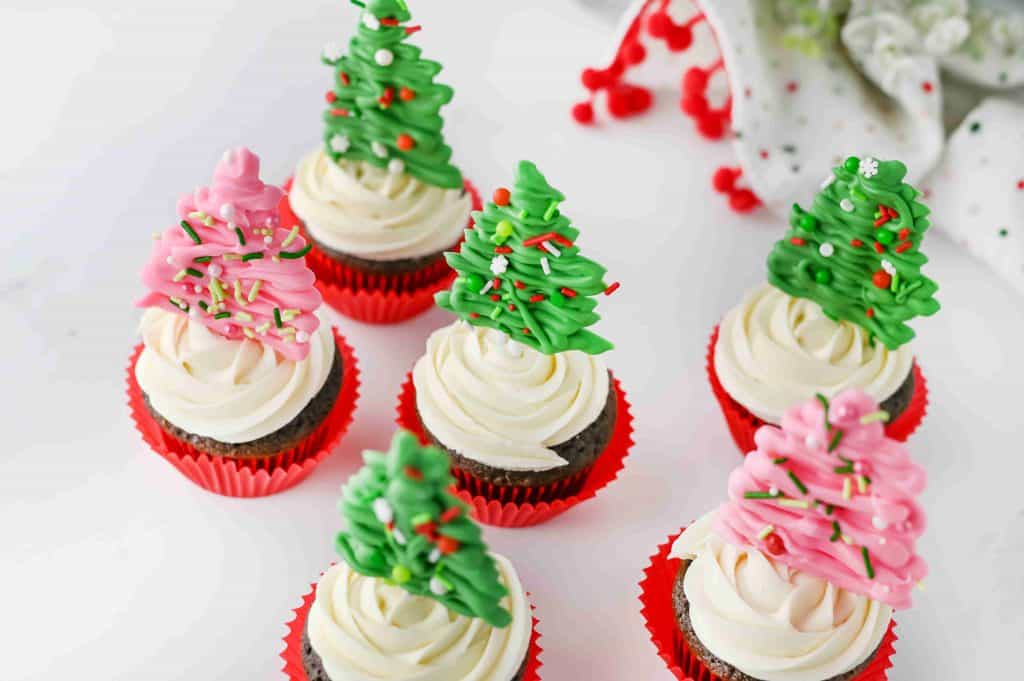
Easy Chocolate Christmas Tree Cupcakes (From a Cake Mix)
These easy chocolate Christmas tree cupcakes are the kind of project that looks impressive on the table, but is totally doable on a busy December day. You start with a simple chocolate cupcake mix, whip up a quick buttercream, then decorate with crunchy candy melt trees and sprinkles for a dessert that feels fun, festive, and photo ready. Grab a box of cake mix and let me walk you through it step by step so your cupcakes turn out great the first time.
Recipe overview
- Prep time: 20 minutes
- Bake time: 15 to 20 minutes (follow your box)
- Yield: 12 cupcakes
These cupcakes are:
- Beginner friendly
- Easy to customize with colors and sprinkles
- Perfect for Christmas parties, potlucks, or Christmas morning brunch
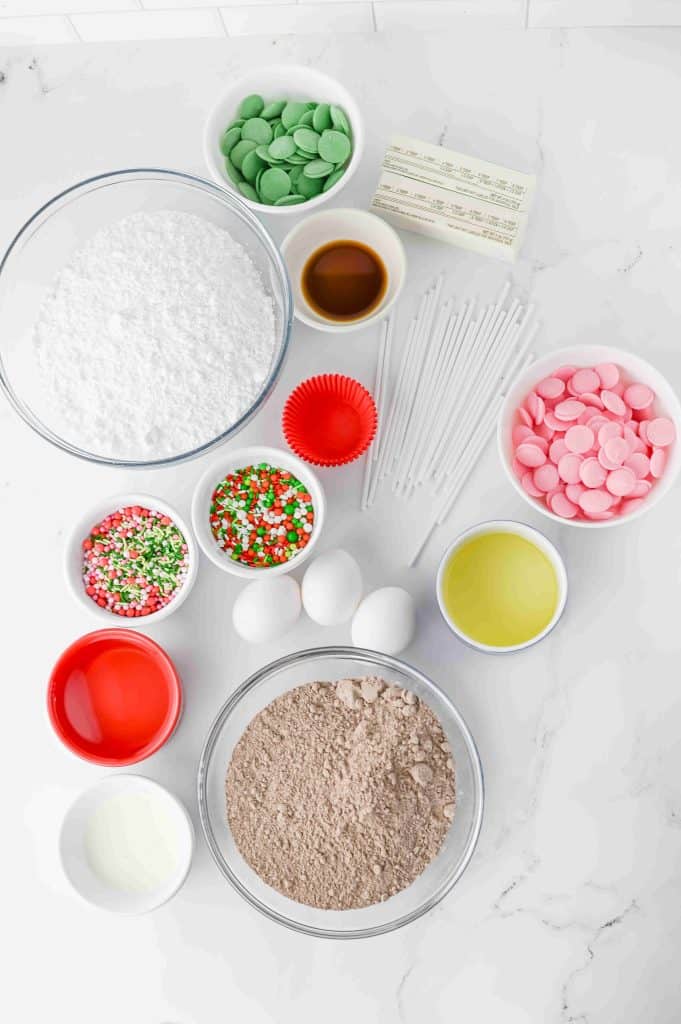
Ingredients
For the chocolate cupcakes
- 1 box chocolate cupcake or cake mix
- Ingredients listed on the box (usually water, oil, and eggs)
For slightly richer cupcakes, you can swap the water with the same amount of milk.
For the buttercream frosting
- 1 cup (225 g) unsalted butter, at room temperature
- 4 to 5 cups powdered sugar (480 to 600 g)
- 2 tablespoons (30 ml) milk
- 1 teaspoon (5 ml) vanilla extract
For the candy melt Christmas trees
- Plastic treat sticks
- 6 ounces (about 170g) dark green candy melts
- 6 ounces (about 170g) pink candy melts
- Christmas sprinkles – classic red and green, pastel, or a mix you love
How to make easy chocolate Christmas tree cupcakes
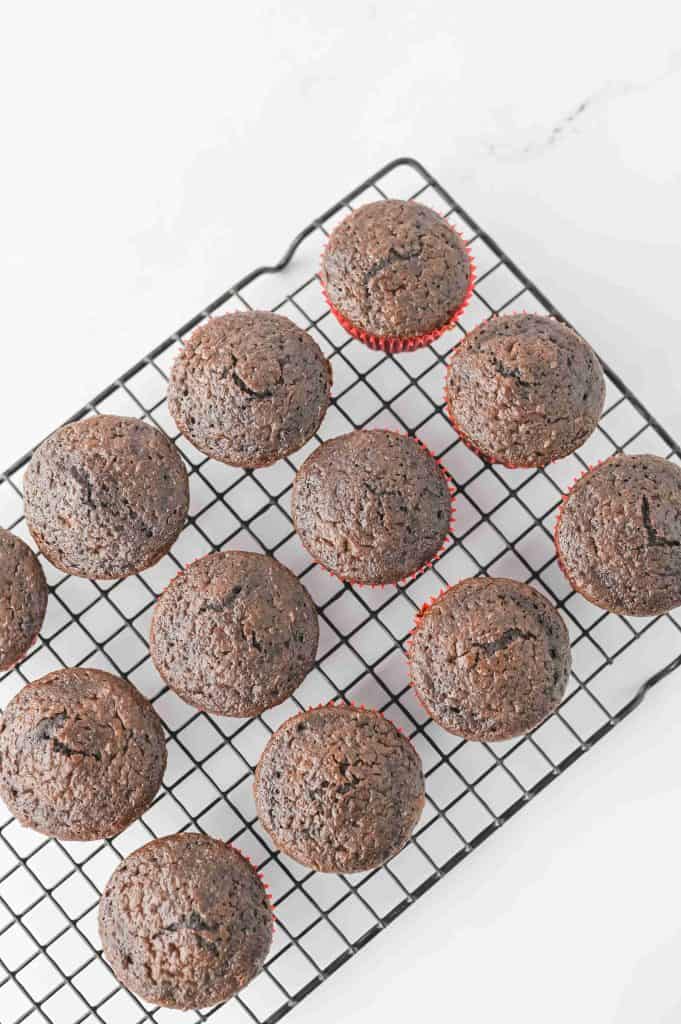
1. Bake the cupcakes
- Preheat your oven and line a 12 cup muffin pan with paper liners.
- Prepare the cupcake batter according to the directions on the box.
Tips for better cupcakes:
- Use room temperature eggs and water (or milk) so the batter mixes evenly.
- Stir just until no dry streaks of mix remain. Overmixing can make the cupcakes dense.
- Fill each liner about two thirds full so they rise nicely without overflowing.
- If your oven has hot spots, rotate the pan halfway through baking.
- Bake until the tops spring back lightly when touched or a toothpick comes out clean.

Let the cupcakes cool in the pan for 5 to 10 minutes, then transfer them to a wire rack and cool completely. Warm cupcakes will melt the frosting, so do not rush this part.
2. Prepare your candy melt trees
While the cupcakes cool, make the trees.
- Place a sheet of wax paper on a cutting board. Use one board for green trees and one for pink.
- Lay the plastic treat sticks on the wax paper, leaving space between them for the tree shapes.
If your kitchen is warm, slide the cutting boards into the fridge for 5 to 10 minutes before you start. A slightly cold surface helps the candy set faster and cleaner.
3. Melt the candy melts
You will repeat this process twice, once for green and once for pink.
- Add the green candy melts to a microwave safe bowl.
- Microwave in 15 second bursts, stirring after each one, until the candy is fully melted and smooth.
Tips for smooth, drizzle friendly candy:
- Use a small, fairly deep bowl so the candy heats evenly.
- If your microwave runs hot, switch to 50 percent power to avoid burning.
- If the melted candy seems thick, stir in 1 teaspoon of neutral oil at a time until it flows easily.
Transfer the melted candy to a piping bag and snip off a very small tip. If you do not have a piping bag, use a zip top bag and snip off one corner.
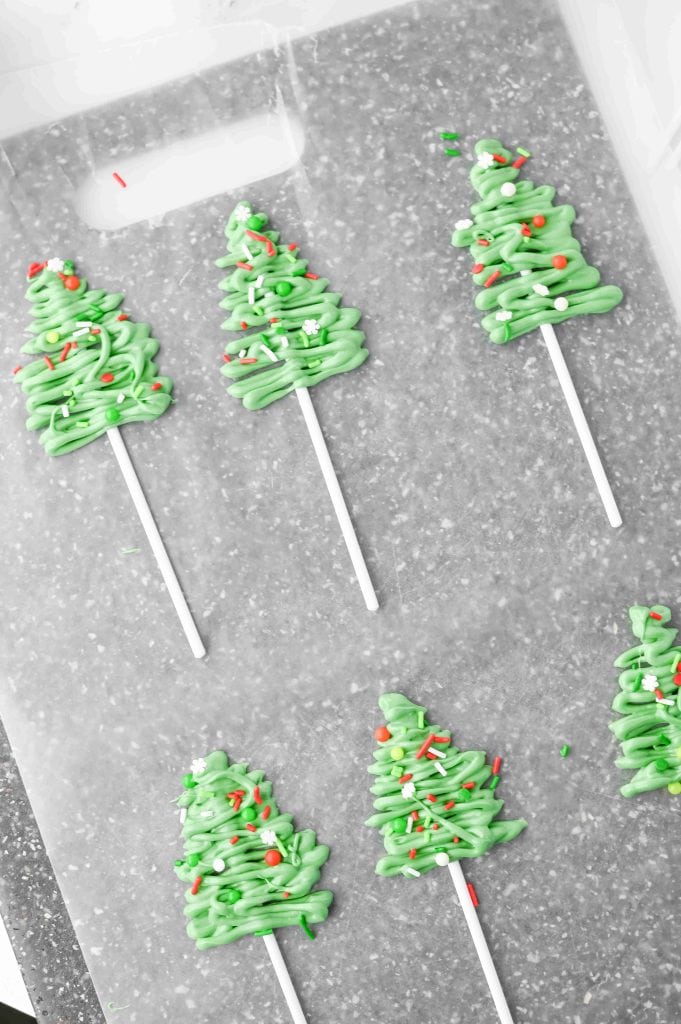
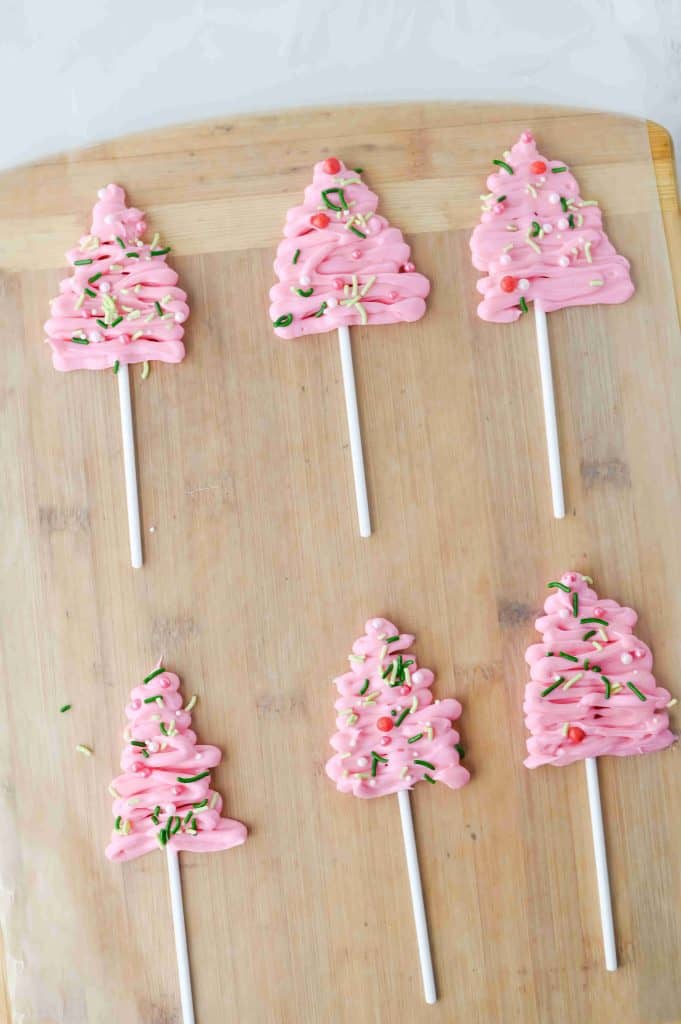
4. Pipe and decorate the trees
- Working over the wax paper with the sticks, pipe the candy in zigzag motions over each stick to create tree shapes. Think wide at the bottom, narrower toward the top.
- Make the area where the candy meets the stick a little thicker. That extra support helps the trees stay attached and not break.
- Gently tap the cutting board on the counter once or twice to help the candy settle into a smooth surface.
- Immediately sprinkle your Christmas sprinkles over each tree while the candy is still wet.
Slide the cutting board into the fridge for 10 to 15 minutes, until the trees are firm. Repeat with the pink candy melts on the second board.
How to remove the trees without breaking them:
Once set, bend the wax paper gently to release the trees. Slide a thin spatula under both the candy and the stick so everything lifts together. If a tree breaks, you can usually stick it back together with a bit of melted candy.
5. Make the buttercream frosting
- Place the room temperature butter in a large bowl. Beat with a mixer for about 1 minute until creamy and slightly lighter in color.
- Add about half of the powdered sugar. Start on low speed so it does not puff everywhere, then increase to medium until combined.
- Add the vanilla extract and mix again.
- Gradually beat in the remaining powdered sugar until the frosting is thick and smooth.
- If the frosting is too stiff, add the milk very slowly, about 1 teaspoon at a time, until it is creamy and pipeable.
Frosting tips:
- Thick frosting is your friend here. It needs to hold the weight of the trees, so aim for a texture that forms soft peaks and does not slump.
- If the frosting becomes too soft, add a little more powdered sugar and beat again.
- For the smoothest texture, sift the powdered sugar before adding it to the bowl.
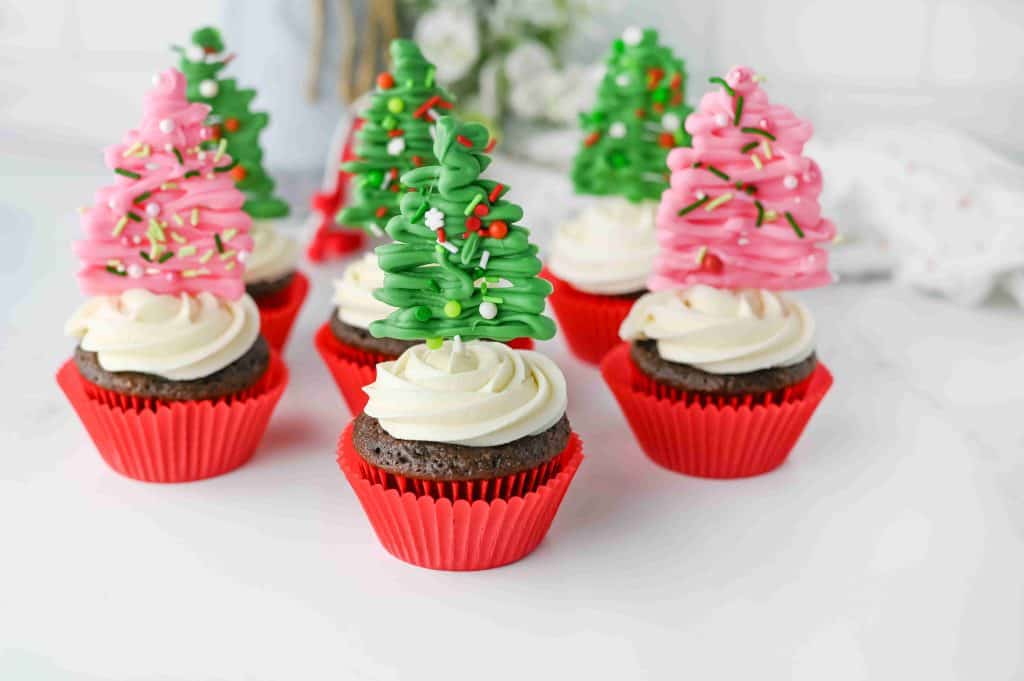
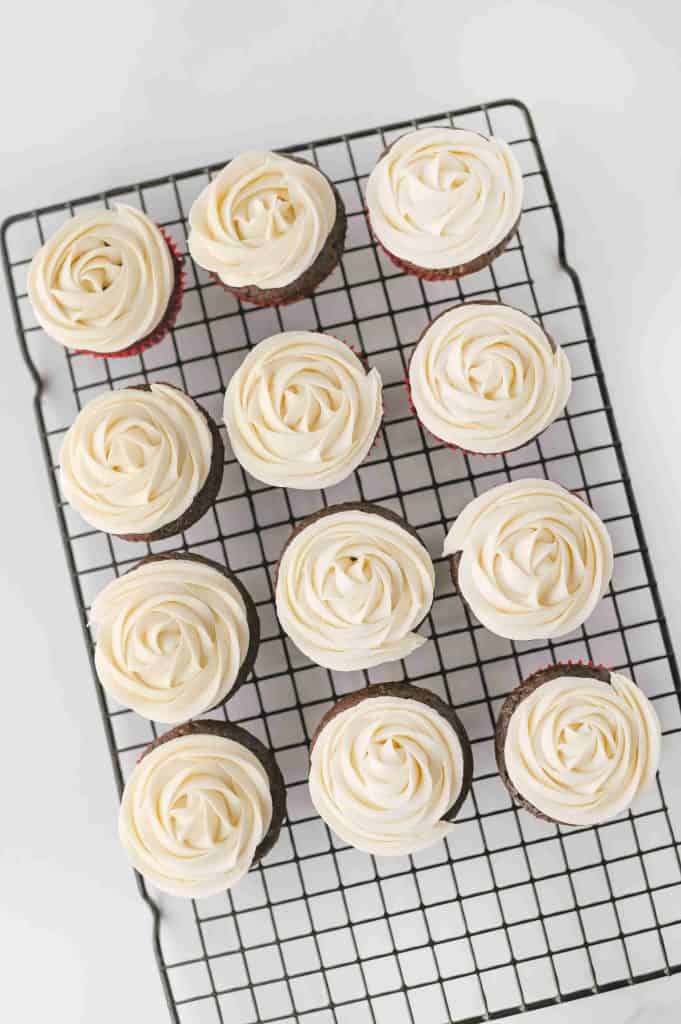
6. Frost the cupcakes
- Make sure the cupcakes are completely cool. If the bottoms still feel warm, wait a bit longer.
- Fill a piping bag fitted with a large round or star tip with the buttercream.
- Pipe generous swirls of frosting on each cupcake. Start from the outer edge and move inward and upward to create a tall swirl.
If you do not have a piping tip, cut a larger opening in a piping bag or zip top bag and pipe a mound of frosting, then smooth or swirl it with the back of a spoon or a small spatula.
If crumbs keep pulling into the frosting, spread a very thin layer on each cupcake first, let it set for a few minutes, then pipe your final swirl on top.
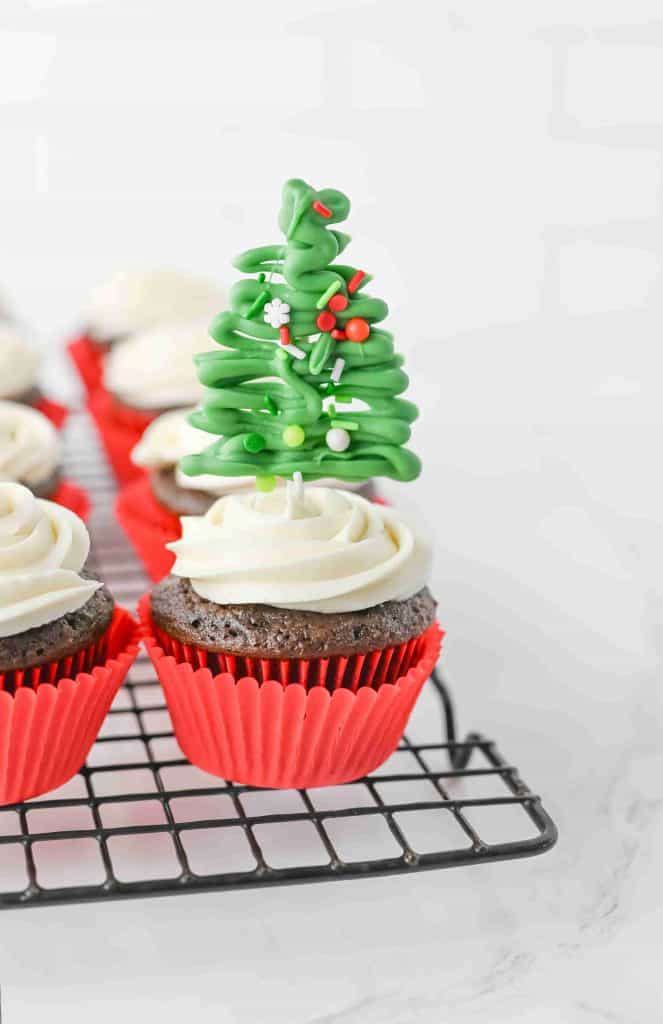
7. Add the Christmas tree toppers
When both the cupcakes and trees are ready:
- Hold a candy tree gently near the base with one hand.
- With the other hand, push the plastic stick straight down into the center of the cupcake, through the frosting and into the cake.
- Stop before you poke through the bottom of the liner. You want enough stick anchored in the cupcake so the tree stands up securely.
Repeat with all the trees. If needed, adjust the angle slightly so each tree stands tall and straight.
Transporting tip:
If you need to travel with these cupcakes, you can frost them at home and add the trees when you arrive. This avoids bumps in the car that might crack the trees.
Make ahead and storage
- Cupcakes: Bake the cupcakes a day ahead, cool completely, and store them unfrosted in an airtight container at room temperature.
- Candy trees: Make the trees 1 to 2 days in advance. Store them flat in a container in the fridge, with sheets of parchment between layers so they do not stick.
- Fully decorated cupcakes: Best served the day you decorate. If you need to hold them longer, place them in a tall container in a cool room or in the fridge. Bring them back to room temperature for about 30 minutes before serving so the texture of the cake and frosting is soft again.
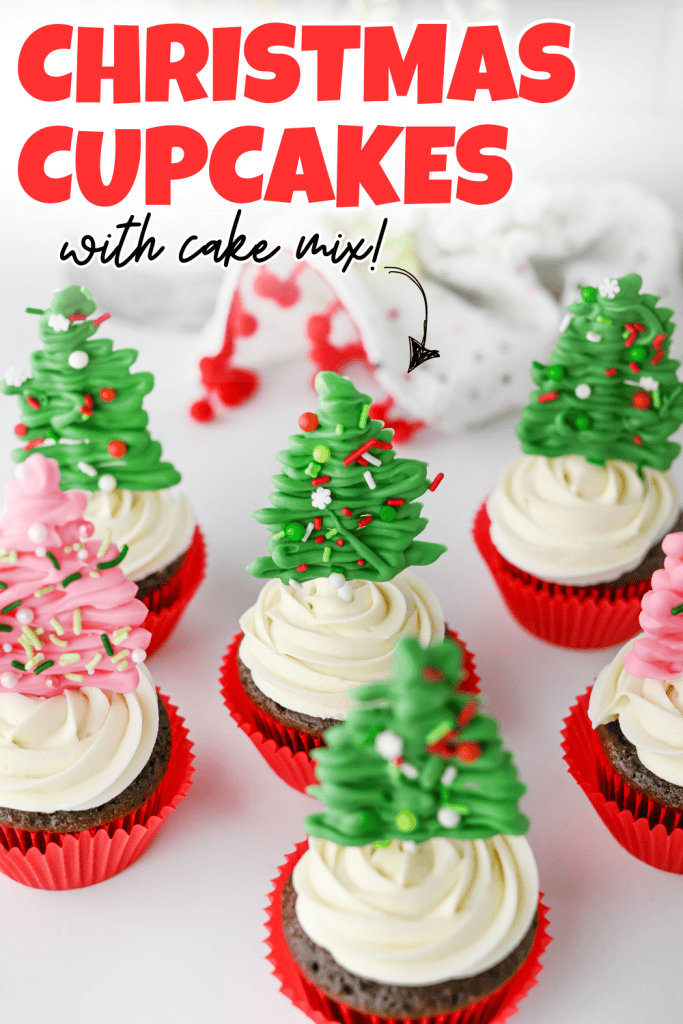
These easy chocolate Christmas tree cupcakes bring a lot of joy for not a lot of effort and they stand out beautifully on any holiday dessert table. Save this recipe for your next Christmas brunch, party, or cozy December baking day and enjoy decorating every little forest of trees.

Easy Chocolate Christmas Tree Cupcakes (From a Cake Mix)
Ingredients
For the chocolate cupcakes
- 1 box chocolate cupcake or cake mix
- Ingredients listed on the box usually water, oil, and eggs
For the buttercream frosting
- 1 cup unsalted butter, at room temperature 225 g
- 4 to 5 cups powdered sugar 480 to 600 g
- 2 tablespoons milk 30 ml
- 1 teaspoon vanilla extract 5 ml
For the candy melt Christmas trees
- 12 Plastic treat sticks
- 6 ounces dark green candy melts about 170g
- 6 ounces pink candy melts about 170g
- Christmas sprinkles – classic red and green, pastel, or a mix you love
Instructions
Bake the cupcakes
- Preheat your oven and line a 12 cup muffin pan with paper liners.
- Prepare the cupcake batter according to the directions on the box.
- Tips for better cupcakes: Use room temperature eggs and water (or milk) so the batter mixes evenly. Stir just until no dry streaks of mix remain. Overmixing can make the cupcakes dense.
- Fill each liner about two thirds full so they rise nicely without overflowing.
- If your oven has hot spots, rotate the pan halfway through baking.
- Bake until the tops spring back lightly when touched or a toothpick comes out clean.
- Let the cupcakes cool in the pan for 5 to 10 minutes, then transfer them to a wire rack and cool completely. Warm cupcakes will melt the frosting, so do not rush this part.
Prepare your candy melt trees
- While the cupcakes cool, make the trees.
- Place a sheet of wax paper on a cutting board. Use one board for green trees and one for pink.
- Lay the plastic treat sticks on the wax paper, leaving space between them for the tree shapes.
- If your kitchen is warm, slide the cutting boards into the fridge for 5 to 10 minutes before you start. A slightly cold surface helps the candy set faster and cleaner.
Melt the candy melts
- You will repeat this process twice, once for green and once for pink.
- Add the green candy melts to a microwave safe bowl.
- Microwave in 15 second bursts, stirring after each one, until the candy is fully melted and smooth.
- Tips for smooth, drizzle friendly candy: Use a small, fairly deep bowl so the candy heats evenly. If your microwave runs hot, switch to 50 percent power to avoid burning. If the melted candy seems thick, stir in 1 teaspoon of neutral oil at a time until it flows easily.
- Transfer the melted candy to a piping bag and snip off a very small tip. If you do not have a piping bag, use a zip top bag and snip off one corner.
Pipe and decorate the trees
- Working over the wax paper with the sticks, pipe the candy in zigzag motions over each stick to create tree shapes. Think wide at the bottom, narrower toward the top.
- Make the area where the candy meets the stick a little thicker. That extra support helps the trees stay attached and not break.
- Gently tap the cutting board on the counter once or twice to help the candy settle into a smooth surface.
- Immediately sprinkle your Christmas sprinkles over each tree while the candy is still wet.
- Slide the cutting board into the fridge for 10 to 15 minutes, until the trees are firm. Repeat with the pink candy melts on the second board.
- Remove the trees without breaking them: Once set, bend the wax paper gently to release the trees. Slide a thin spatula under both the candy and the stick so everything lifts together. If a tree breaks, you can usually stick it back together with a bit of melted candy.
Make the buttercream frosting
- Place the room temperature butter in a large bowl. Beat with a mixer for about 1 minute until creamy and slightly lighter in color.
- Add about half of the powdered sugar. Start on low speed so it does not puff everywhere, then increase to medium until combined.
- Add the vanilla extract and mix again.
- Gradually beat in the remaining powdered sugar until the frosting is thick and smooth.
- If the frosting is too stiff, add the milk very slowly, about 1 teaspoon at a time, until it is creamy and pipeable.
- Frosting tips: Thick frosting is your friend here. It needs to hold the weight of the trees, so aim for a texture that forms soft peaks and does not slump. If the frosting becomes too soft, add a little more powdered sugar and beat again. For the smoothest texture, sift the powdered sugar before adding it to the bowl.
Frost the cupcakes
- Make sure the cupcakes are completely cool. If the bottoms still feel warm, wait a bit longer.
- Fill a piping bag fitted with a large round or star tip with the buttercream.
- Pipe generous swirls of frosting on each cupcake. Start from the outer edge and move inward and upward to create a tall swirl.
- If you do not have a piping tip, cut a larger opening in a piping bag or zip top bag and pipe a mound of frosting, then smooth or swirl it with the back of a spoon or a small spatula.
- If crumbs keep pulling into the frosting, spread a very thin layer on each cupcake first, let it set for a few minutes, then pipe your final swirl on top.
Add the Christmas tree toppers
- When both the cupcakes and trees are ready:
- Hold a candy tree gently near the base with one hand.
- With the other hand, push the plastic stick straight down into the center of the cupcake, through the frosting and into the cake.
- Stop before you poke through the bottom of the liner. You want enough stick anchored in the cupcake so the tree stands up securely.
- Repeat with all the trees. If needed, adjust the angle slightly so each tree stands tall and straight.
Notes
Transporting tip:
If you need to travel with these cupcakes, you can frost them at home and add the trees when you arrive. This avoids bumps in the car that might crack the trees.Make ahead and storage:
- Cupcakes: Bake the cupcakes a day ahead, cool completely, and store them unfrosted in an airtight container at room temperature.
- Candy trees: Make the trees 1 to 2 days in advance. Store them flat in a container in the fridge, with sheets of parchment between layers so they do not stick.
- Fully decorated cupcakes: Best served the day you decorate. If you need to hold them longer, place them in a tall container in a cool room or in the fridge. Bring them back to room temperature for about 30 minutes before serving so the texture of the cake and frosting is soft again.